


How to Build Your Own Dialer (BYOD) – Part 1
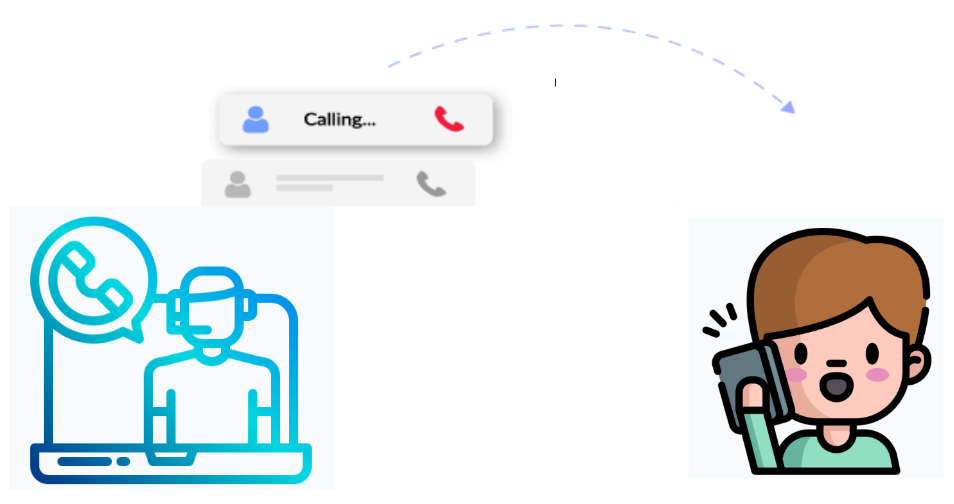
What is a Dialer?
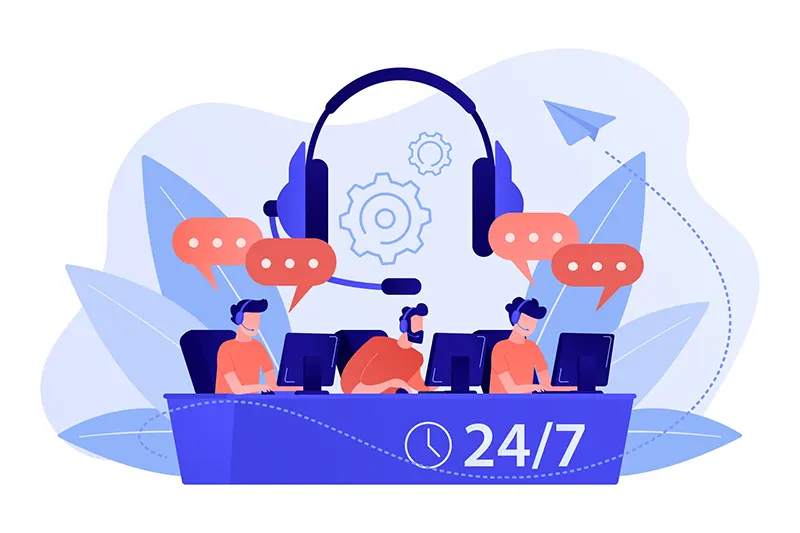
A dialer is a specialised software programme created to streamline customer service interactions. It's done by automating outbound dialing activities. Call centre dialers are employed in sales and telemarketing, and may be used for debt collection or other proactive customer operations. A dialer helps with the automatic dialling of the phone numbers and can also check for busy signals, voicemails and disconnected numbers. Dialers aid call centres in managing large quantities of our bound calls and are able to link answered calls to the available agents. Taking this forward we can now talk about the different kinds of dialer.
Types of Dialer
The various Dialers are discussed as follows.
| Regular Phone | Preview Dialer | Power Dialer | Progressive Dialer | Predictive Dialer | |
|---|---|---|---|---|---|
| Keyless Dialling | ❌ | ✅ | ✅ | ✅ | ✅ |
| Automatic Dial Next Call | ❌ | ❌ | ✅ | ✅ | ✅ |
| Handle Busy / Unknown | ❌ | ❌ | ❌ | ✅ | ✅ |
| Distributes Calls | ❌ | ❌ | ❌ | ✅ | ✅ |
| Reduce Agent Wait Time | ❌ | ❌ | ❌ | ❌ | ✅ |
| Steady Flow of Calls | ❌ | ❌ | ❌ | ✅ | ✅ |
| Agents have control over call initiation and pacing | ✅ | ✅ | ❌ | ❌ | ✅ |
| Analyzes historical data and predicts agent availability | ❌ | ❌ | ❌ | ❌ | ✅ |
| Filters out busy signals, and unanswered calls | ❌ | ❌ | ✅ | ✅ | ✅ |
| Adjusts dialing speed based on predicted agent availability | ❌ | ❌ | ❌ | ❌ | ✅ |
| Ensures minimal agent downtime | ❌ | ❌ | ❌ | ✅ | ✅ |
| Customizable call scripts | ❌ | ✅ | ✅ | ✅ | ✅ |
| Abandon rate and acceptable wait time thresholds | ❌ | ❌ | ❌ | ❌ | ✅ |
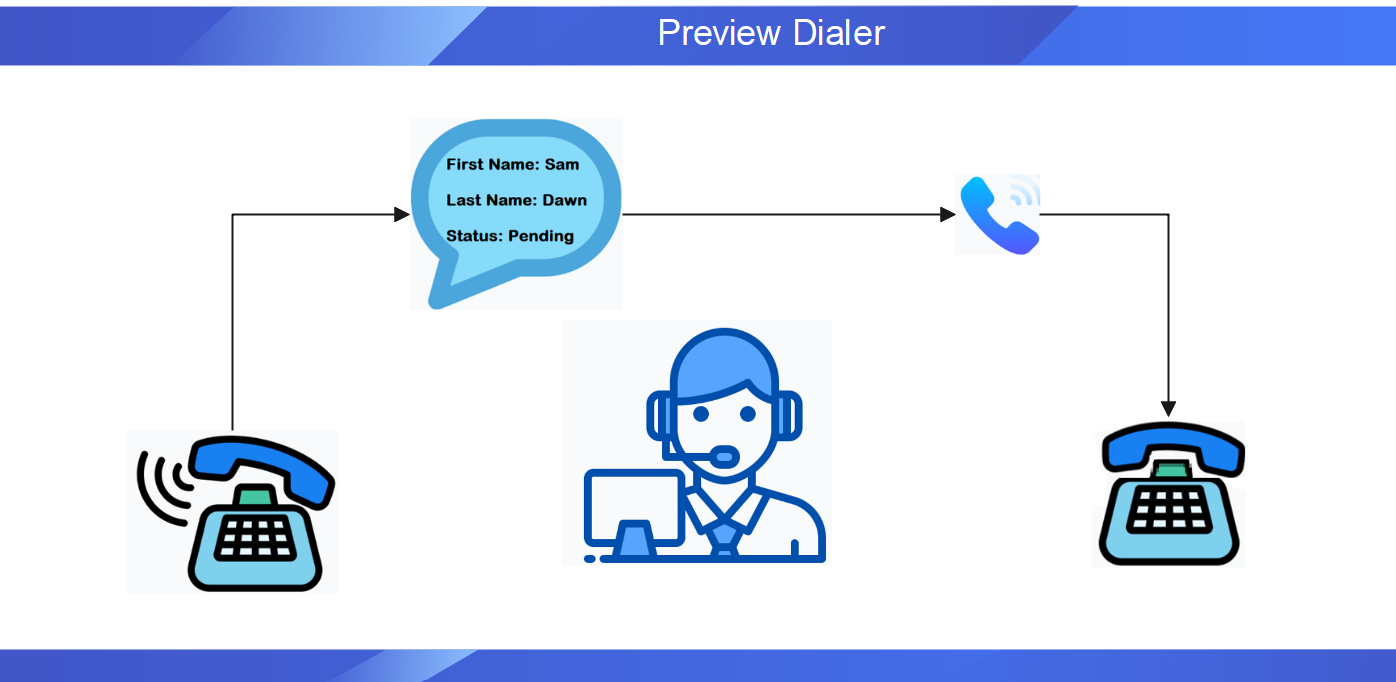
So we begin with building up the one of the basic dialers which is the Preview Dialer. As it enables agents to examine customer data before placing a call, thereby creating a more personalised and effective customer experience.
Before moving on, we should get some more understanding of the Preview Dialer.
What is a Preview Dialer?
A Preview Dialer automates the outbound calling procedures by dialing numbers from a pre-defined list. It's intended to maximize productivity and efficiency. It is most effective when used by call centers and for telemarketing activities.
It also enables agents to examine customer data before placing a call. It also provides a more personalized and effective customer experience.
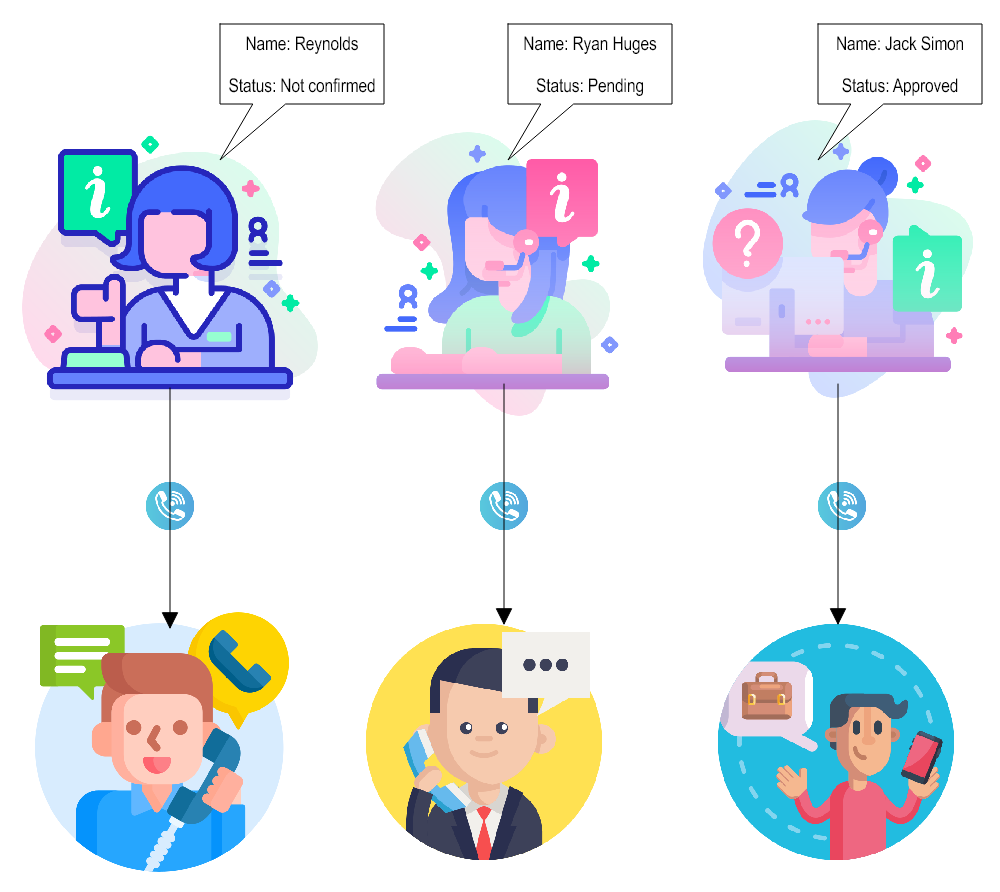
The customer (call center) must first upload a list of customer phone numbers into the dialer's database. After that, the dialer selects a number from the list and gives it to the agent. The dialer can also provide any pertinent client data to the agent. After reviewing the data, the agent can decide whether to make the call or move on to the next number. Agents can plan follow-up calls, assign priority levels to clients, add notes/comments to customer records, and much more.
One of the key advantages of a preview dialer is that it allows agents to prepare themselves for each call, increasing the chances of successful customer interactions. The system also reduces the risk of abandoned calls or wrong numbers, as the dialer can automatically screen out disconnected or invalid phone numbers.
Benefits of a Preview Dialer
The Preview Dilaer feature comes with a bag full of advantages it offers to the various Call Centres. We now discuss some of the significant ones.
01. Increased Agent Productivity
Using a preview dialer, agents can be ready before a call by reviewing client data.
Data may include their name, contact information, and previous interactions with the business. As a result, they can manage the call more effectively, which boosts productivity.


02. Better Customer Engagement
Agents can interact with customers more efficiently. It's because they have prior access to customer
information before making a call. Better customer experiences result from customized client demands, preferences, and behaviors.
03. Compliance with regulations Preview dialers allow call-centres to follow regulations. It ensures that agents only make calls to numbers that
are not on the Do-Not-Call list. This helps call-centres to avoid costly fines and legal issues.
04. Improved Call Quality
Preview dialers can filter out wrong or disconnected numbers.
This feature helps reduce the number of dropped or unanswered calls. This leads to higher call quality and a better customer experience.
05. Better Data Management
Preview dialers can integrate with customer relationship management (CRM) systems.
This allows call-centres to track customer interactions and manage data. This can help call centers make better business decisions and improve customer relationships.
Now that we have learnt about Preview Dialer and its benefits. We are now excited to share what we have in store for you at ConnexCS.
Preview Dialer on ConnexCS
We at ConnexCS provide you with a full raft of feature customizations for creating a Preview Dialer. Here, we help you customize your Stock Webphone with a Dialer feature. For designing your own convenient and fancy Webphone, we provide features like Page Builder and ScriptForge.
The Page Builder helps you build the interface, and Script Forge is for compiling scripts and small applications.
Another interesting feature is that adding the button for the Preview Dialer can be done with the help of the Button Builder.
Let’s consider an example where an agent at a call-centre has to make calls to people about a new product. The requirements of a call-centre can be that the customer's number should not be visible to the agent before they make the call. So, when the agent clicks on the "Dial" button, what happens behind the scenes is that it will call a number from the database, load up the number into this interface, and it will automatically dial the number. Consequently, you will be able to see the number that the system is dialing. For example, you can add the city, state, or country the number is from. You can also have a file that stores the last number called, the duration of the call, and much more.
Another integration you can do is include the Answered Call button. Once the call is answered, you click on the button and you can see information like the person's first name, last name, etc. When the calls are over, you can Save the information, which is pushed back into the database.
Using ConnexCS, you can build and run your own Preview Dialer. We provide you with ultimate features so you can add various customizations to your Dialer.
Now, we try and create a Dialer for you..!!!
Building a Preview Dialer on ConnexCS
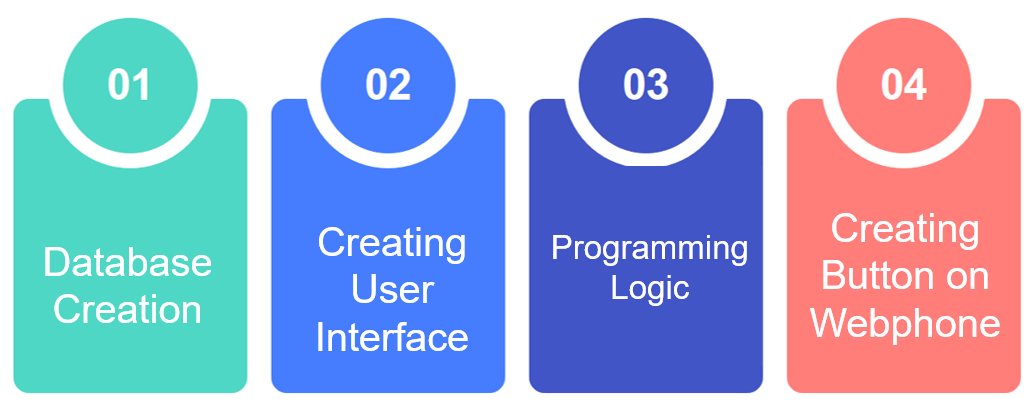
Let’s begin with the most interesting part which is BYOD (Build Your Own Dialer). It’s a 4- Step process; the first step is to create the Customer Dialer database; the second step is to create the User Interface, the third step is to create the Programming Logic for the Preview Dialer; and finally, create the button on Webphone to access the fucntionality.
Step 1
- Login to your Customer Portal.
- Go to Developer > Database.
- Click on blue
+sign to create a new database.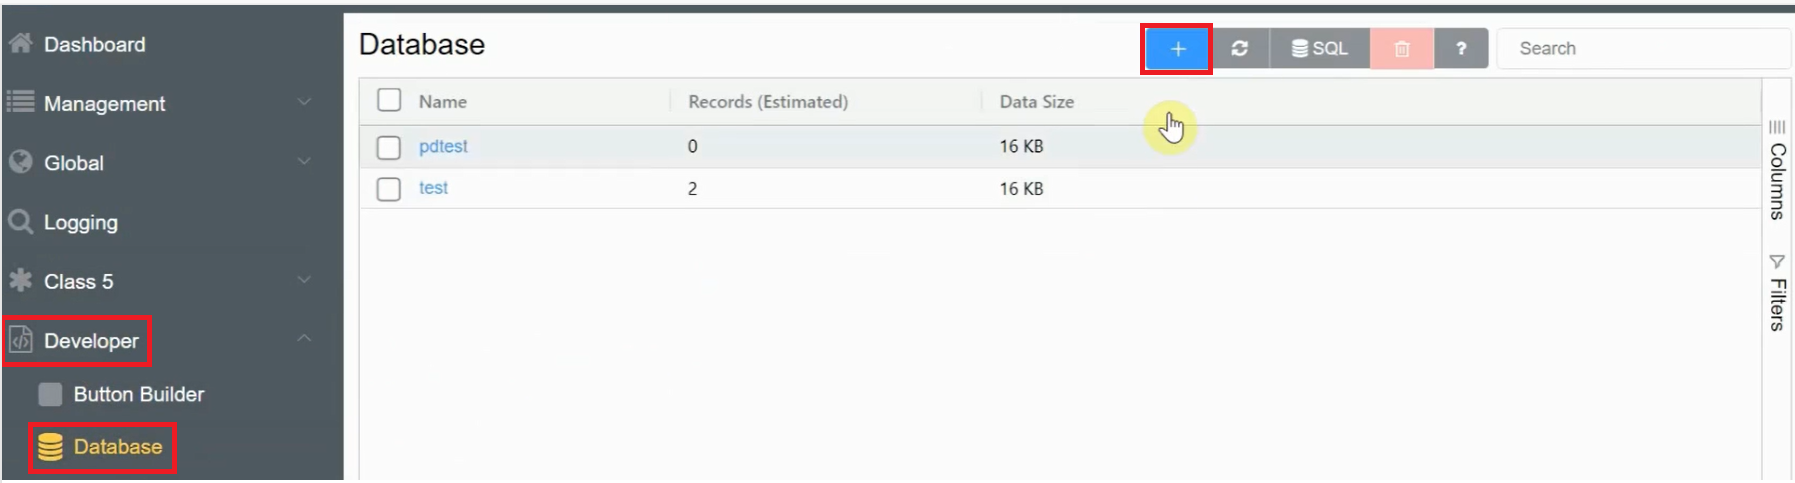
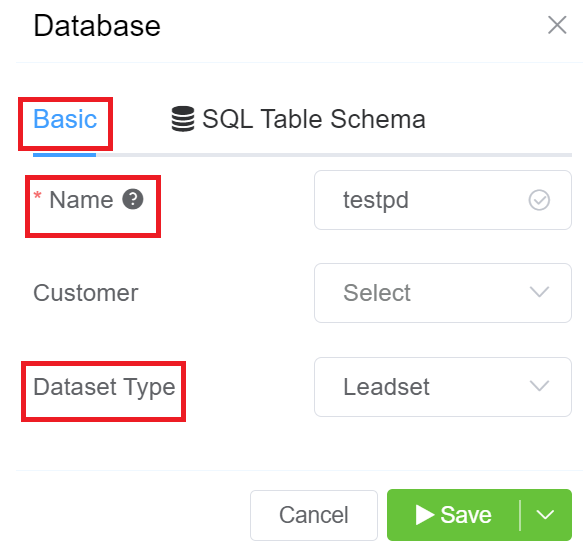
- Write the name of your database (testpd in this example) and select Leadset from the Dataset Type dropdown in the Basic Tab.
- Select the SQL Table Schema and change the Type of the Key parameter to increments, and click on Save. This will create and save your database.
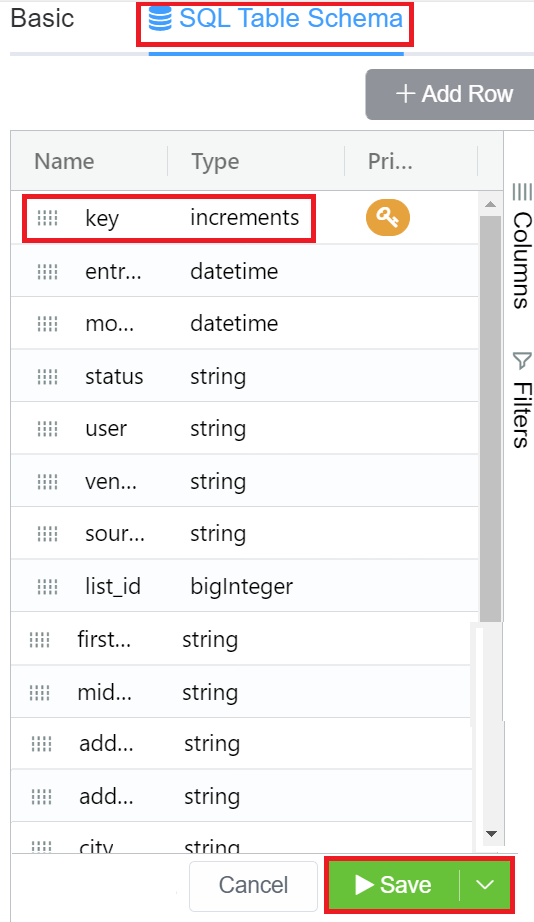
- After refreshing the page, click on your created database.
- Click on the blue
+sign, which will open a form with various entries. The form is generated by the parameters of the leadset. - In this example, we have considered three fields, First name, Last name, and Phone Code. Also, in the Status field write agent1 and save the form.
By following these steps, you have created the customer database.
We now see how Step 2 works.
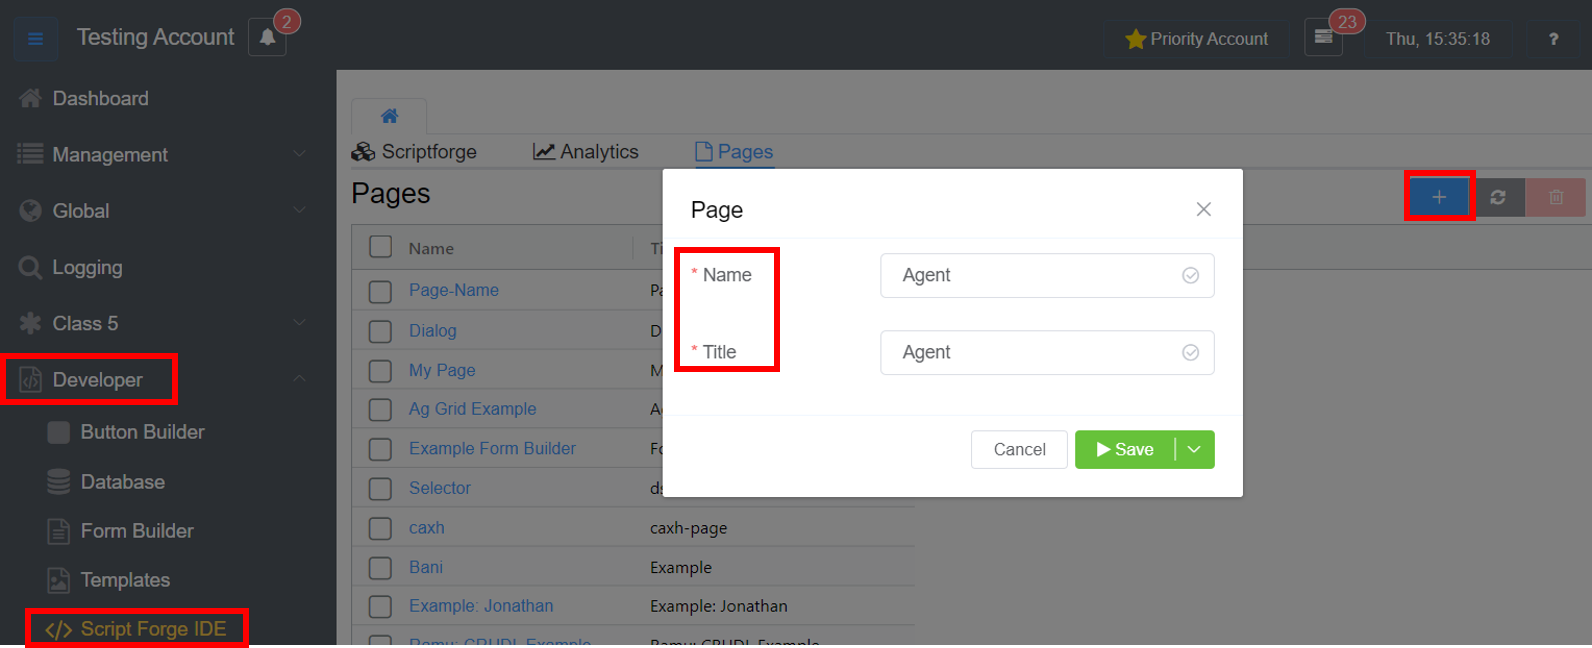
Step 2
- Login to your Customer Portal.
- Go to Developer > Script Forge IDE > Pages.
- Click on blue
+sign.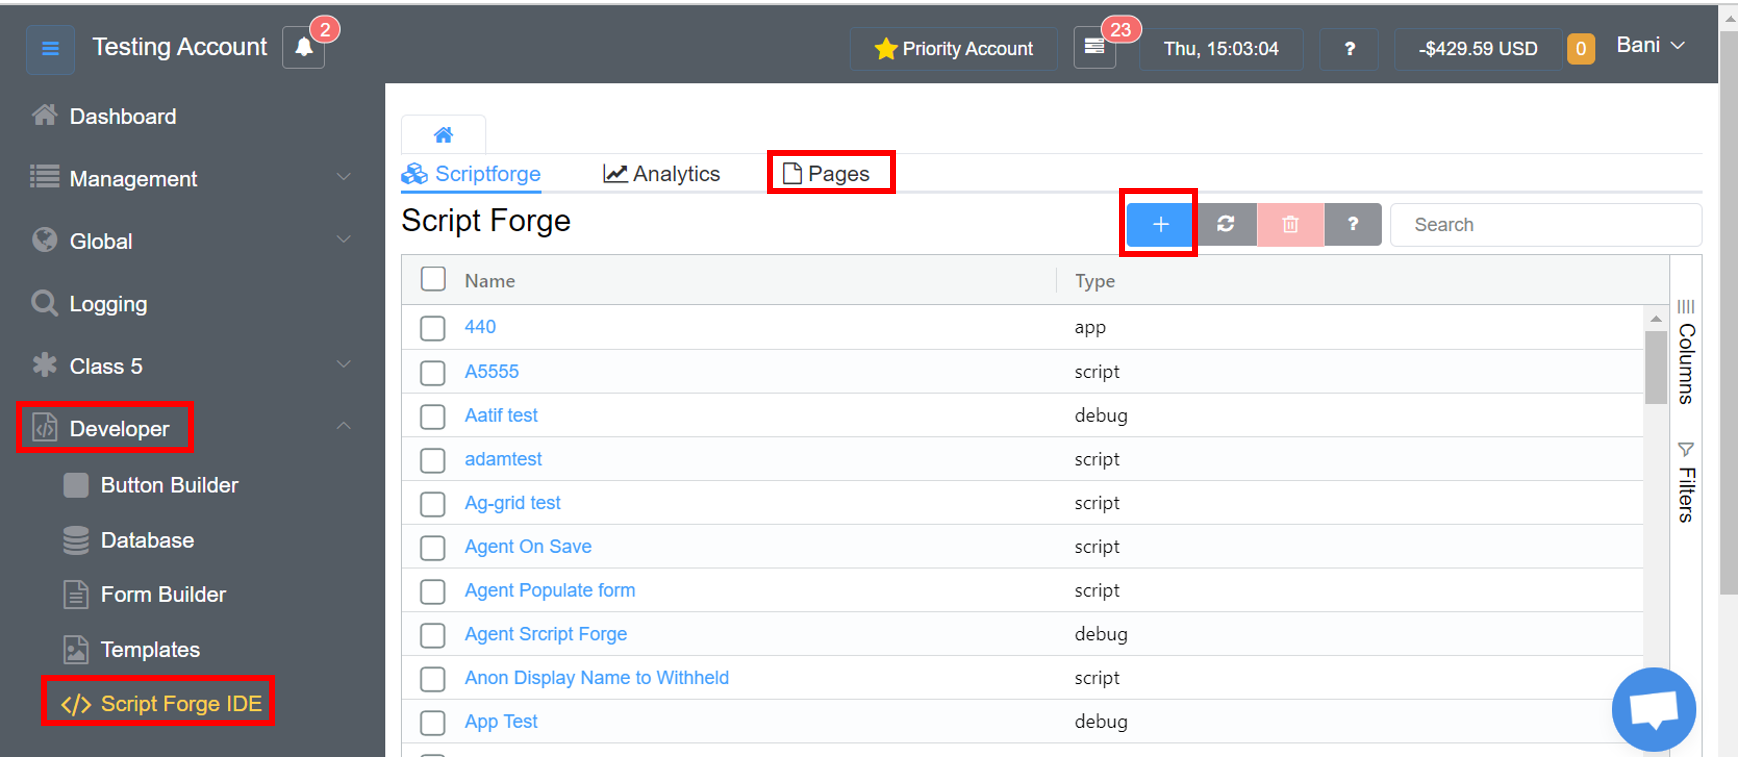
- Insert the Name and Title (Preview Dialer in this example) and click on
Save.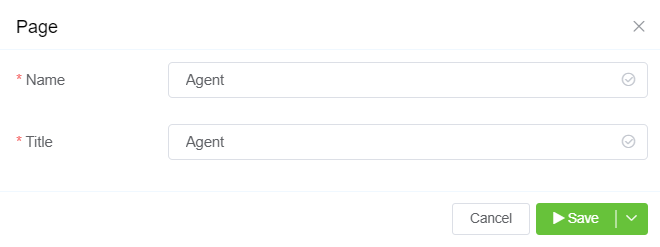
- Click on the Preview Dialer page you just created.
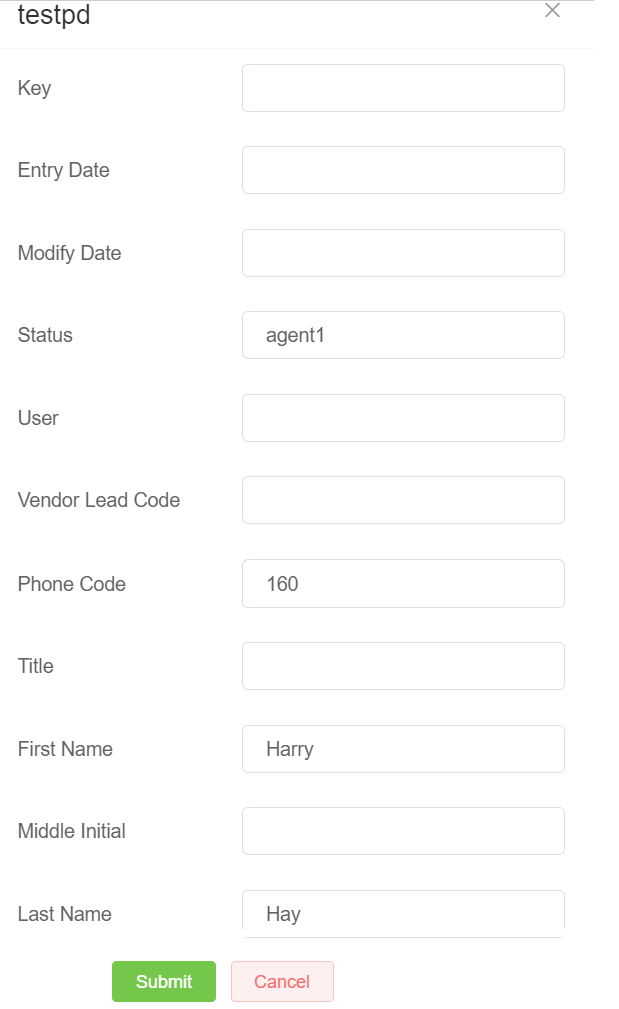
- First insert the Input Fields (variable) like First Name, Last Name, and Phone Code.
- Insert the Buttons to perform various functions like Dial, End Call, Save and Next.
- Click
Saveon the main page to save the created Page (Preview Dialer). - Click on
Previewto view the interface.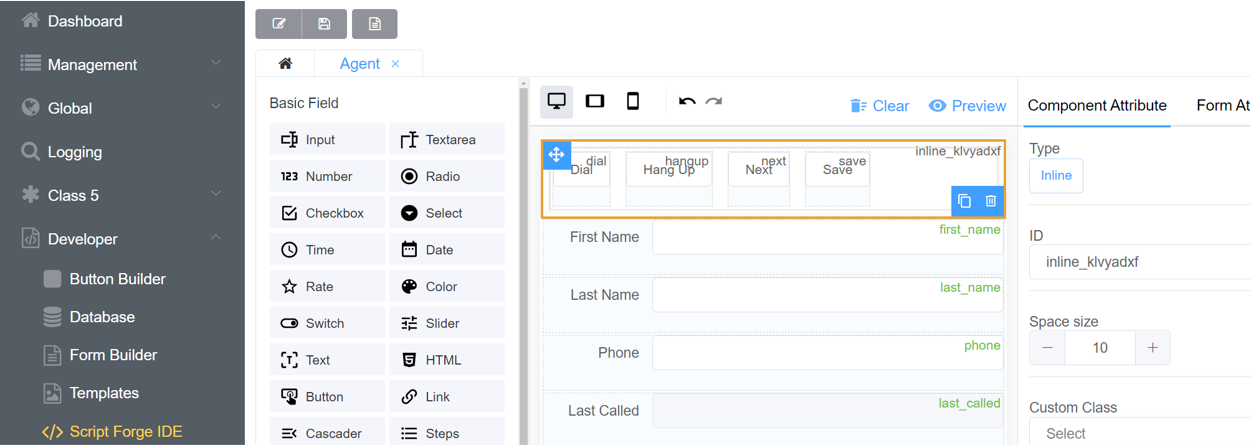
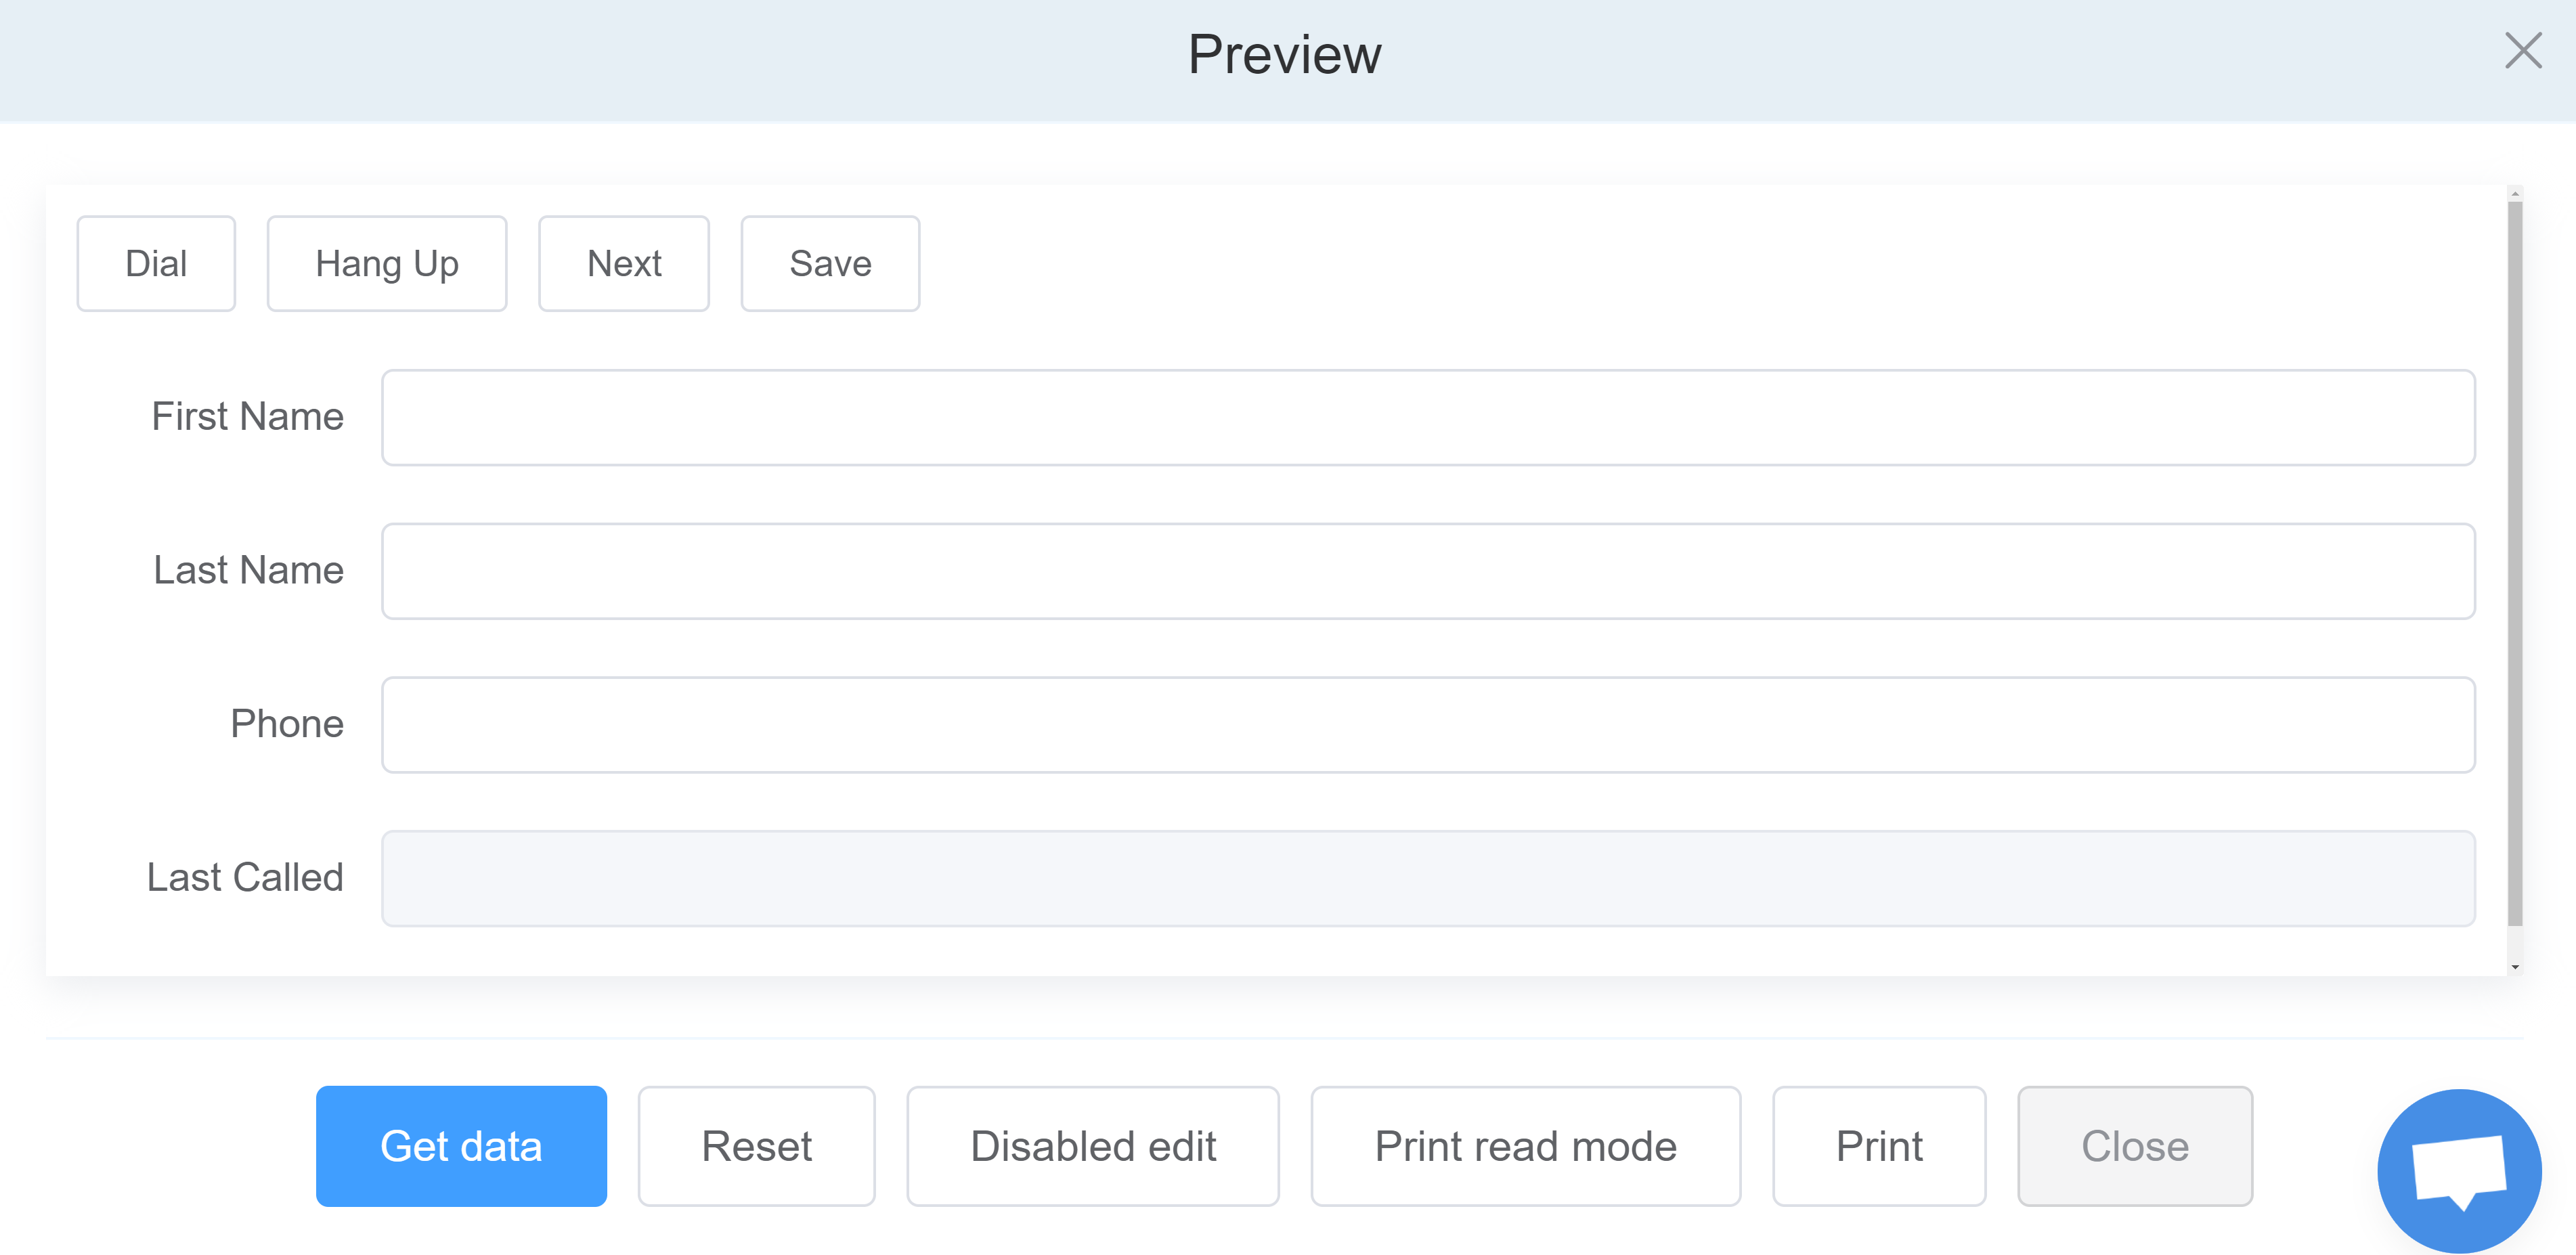
Below are the output images of Step 2.
The next step is to provide the Programming Logic to the system.
Let’s get started by following the subsequent steps.
Step 3
- Login to your Customer Portal.
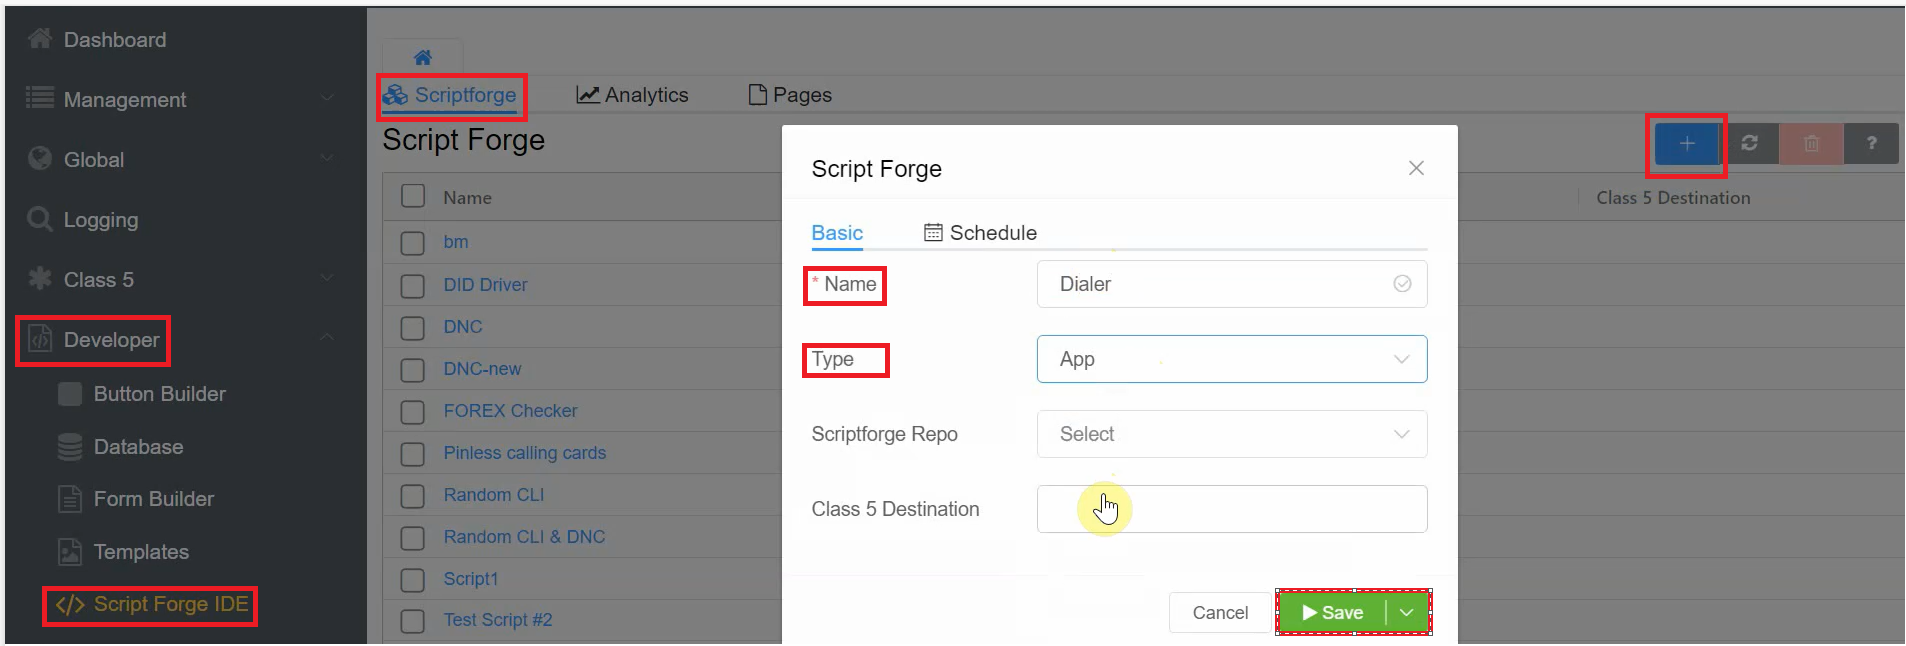
- Go to Developer > ScriptForge IDE > ScriptForge.
- Click on blue
+sign to add the code for Reading and Updating the customer database. - You can add your code script here. Refer to our ScriptForge documentation for additional information. The script we have created is Dialer.
- Select the Type as App.
- Click on
Saveto add the script.
- After refreshing the page, click on the created Dialer script, add the code and
Saveit.
- The next step is to add the codes for the buttons we created on the Preview Dialer page and to link the Dialer script to the Preview Dailer page.
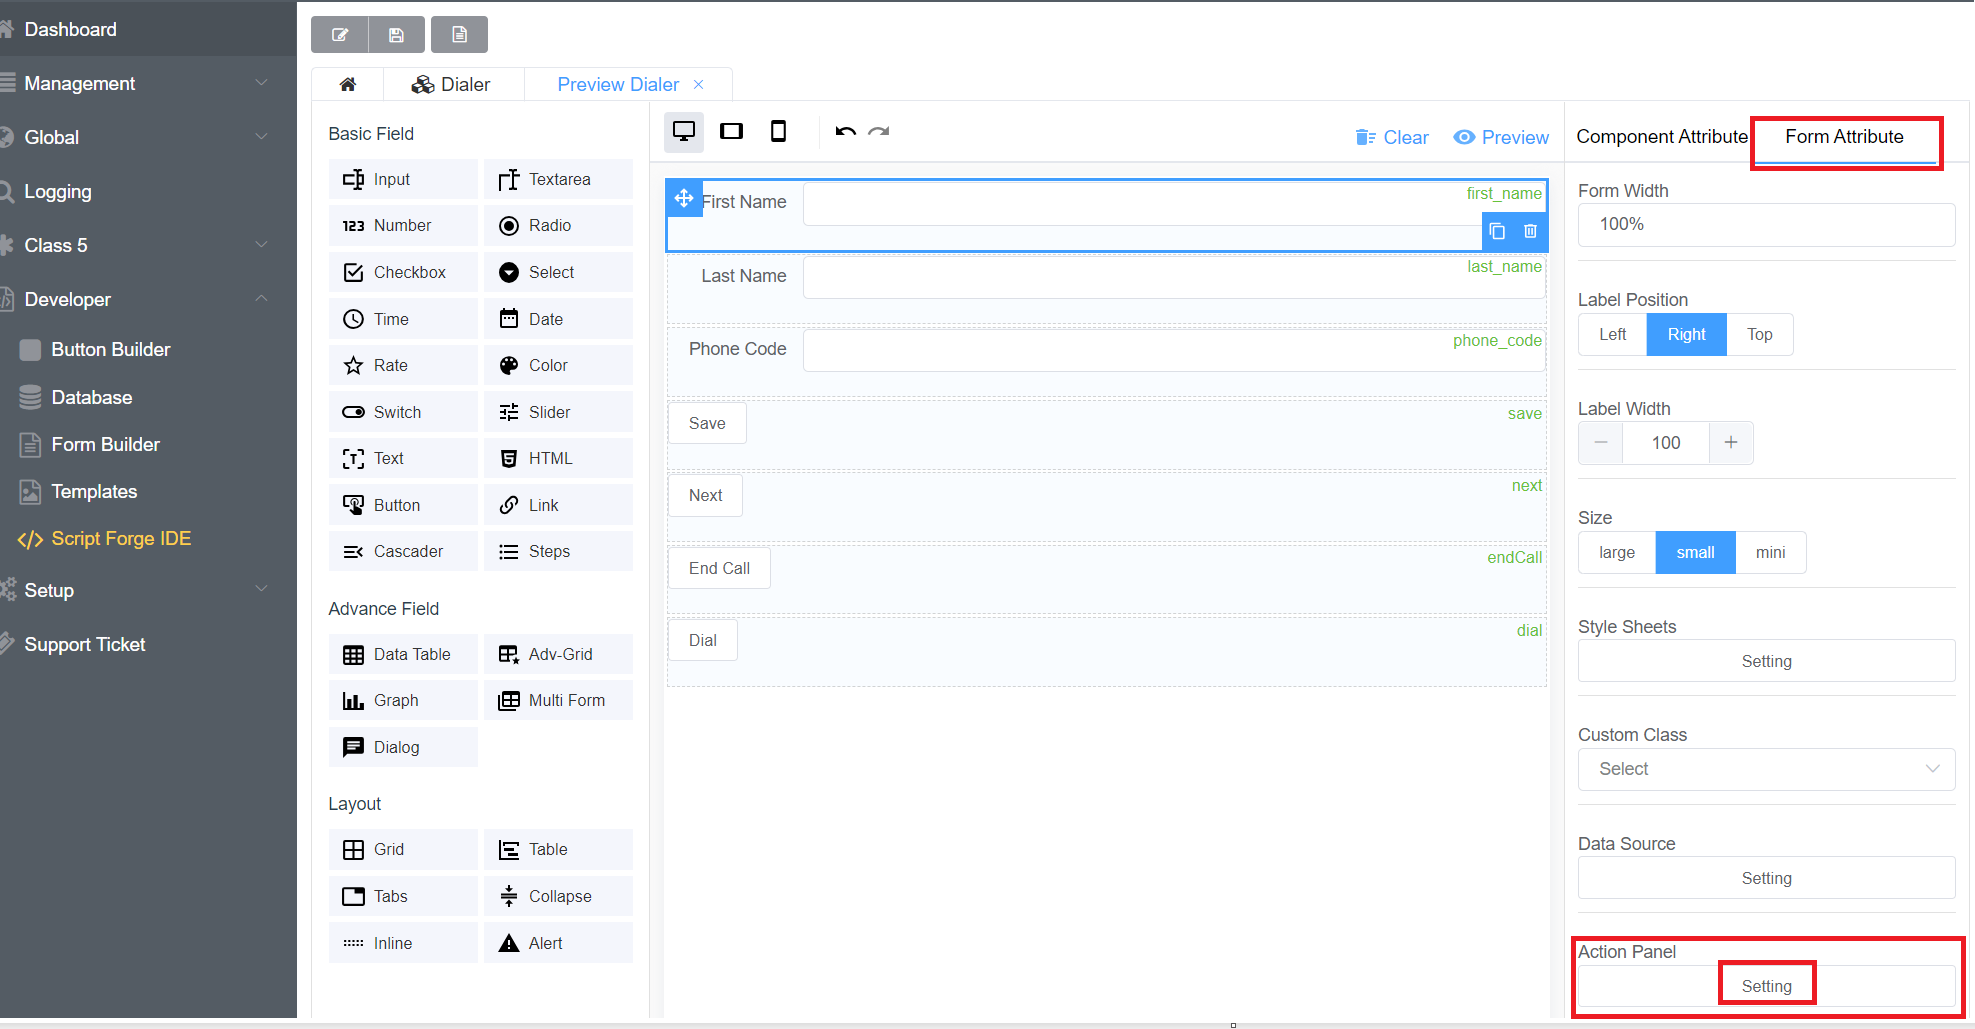
- Click on Pages, then Preview Dialer page.
- Click on Form Attribute then Setting under Data Source.
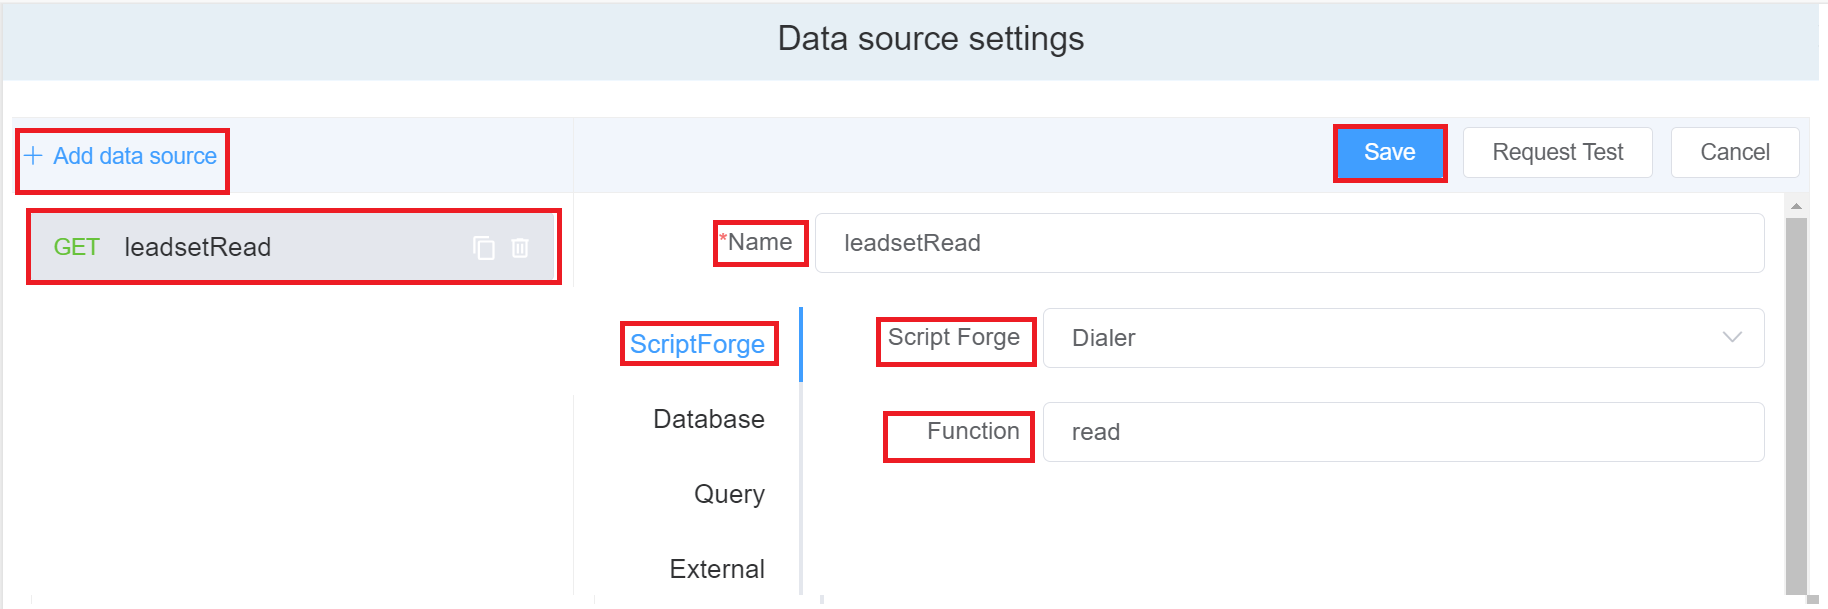
- Then Click on Add data source and rename it to leadsetRead.
- Next, from the Script Forge dropdown select the Dialer script and name the function as read and click on the blue `Save' button.
- Again Click on Add data source and rename it to leadsetUpdate.
- Next, from the ScriptForge dropdown select the Dialer script and name the function as update and click on the blue
Savebutton.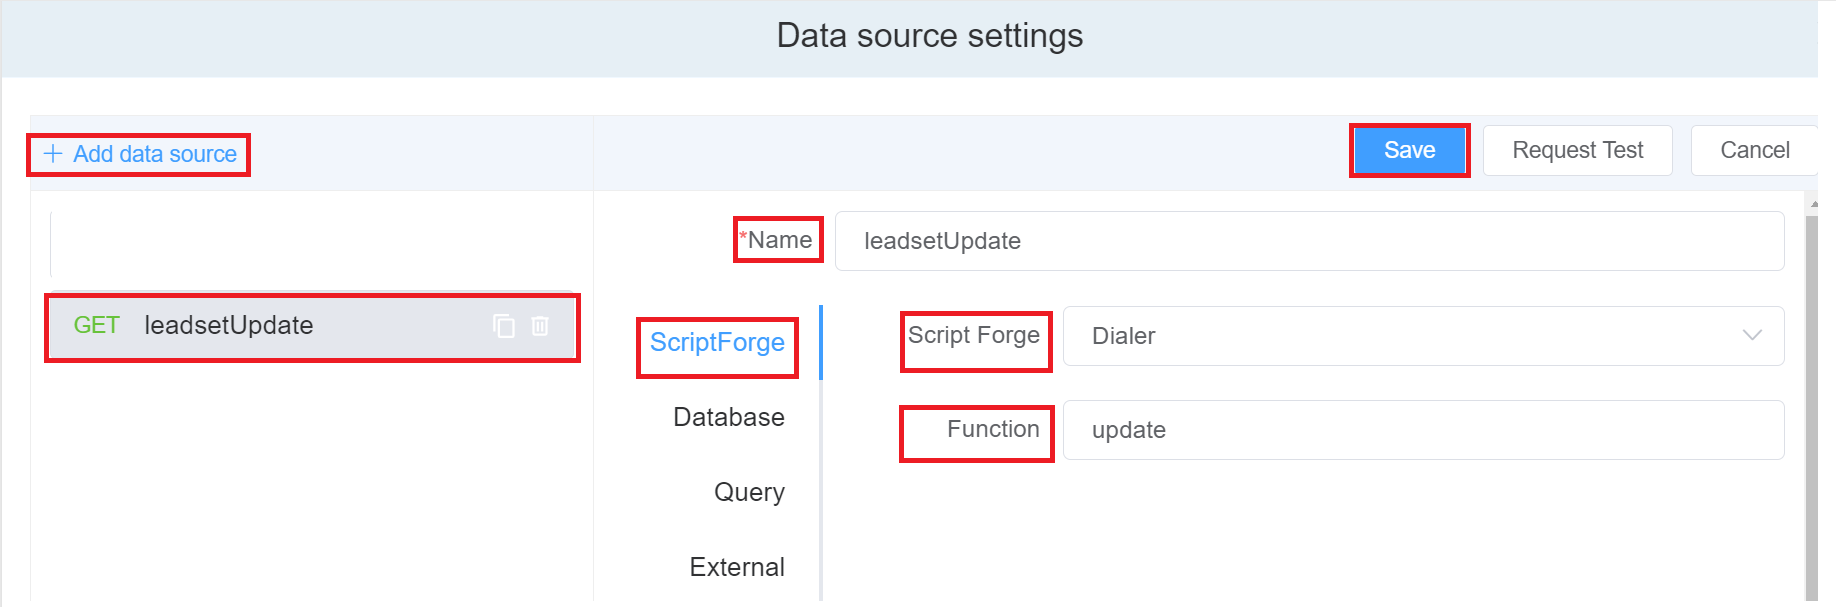
- After saving, click on Cancel to jump out of the window and click on the
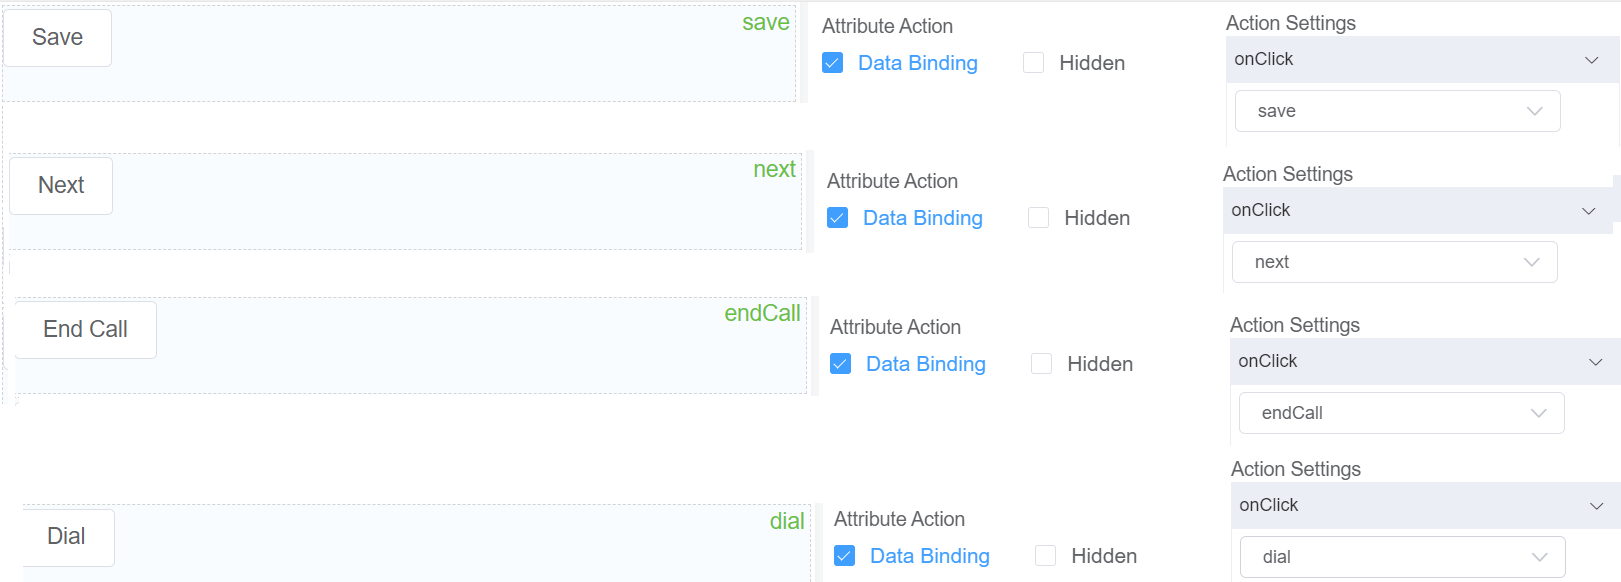
Savebutton (on the main page) on the top-left. - The next step is to code the buttons (Save, Next, End Call, Dial).
- Click on Form Attribute then Setting under Action Panel.
 Next, Click on Add Action.
Change the function name to “save”, add the “save” code, and click on the
Next, Click on Add Action.
Change the function name to “save”, add the “save” code, and click on the Savebutton on the top-right of the window. - Repeat the same process for the remaining buttons which are next, endcall and dial.
Don’t forget to ‘save’ the main page on the top left, for each button.
- Click on the Component Attribute of the Page and check on the Data Binding option under Attribute Action.
- Click on Action Settings then onClick and choose options for various buttons. For example, for the “save” button, select “save”, for the “next” button “Next”, for the “dial” button “dial,” and for the “end call” button, select “endCall”.
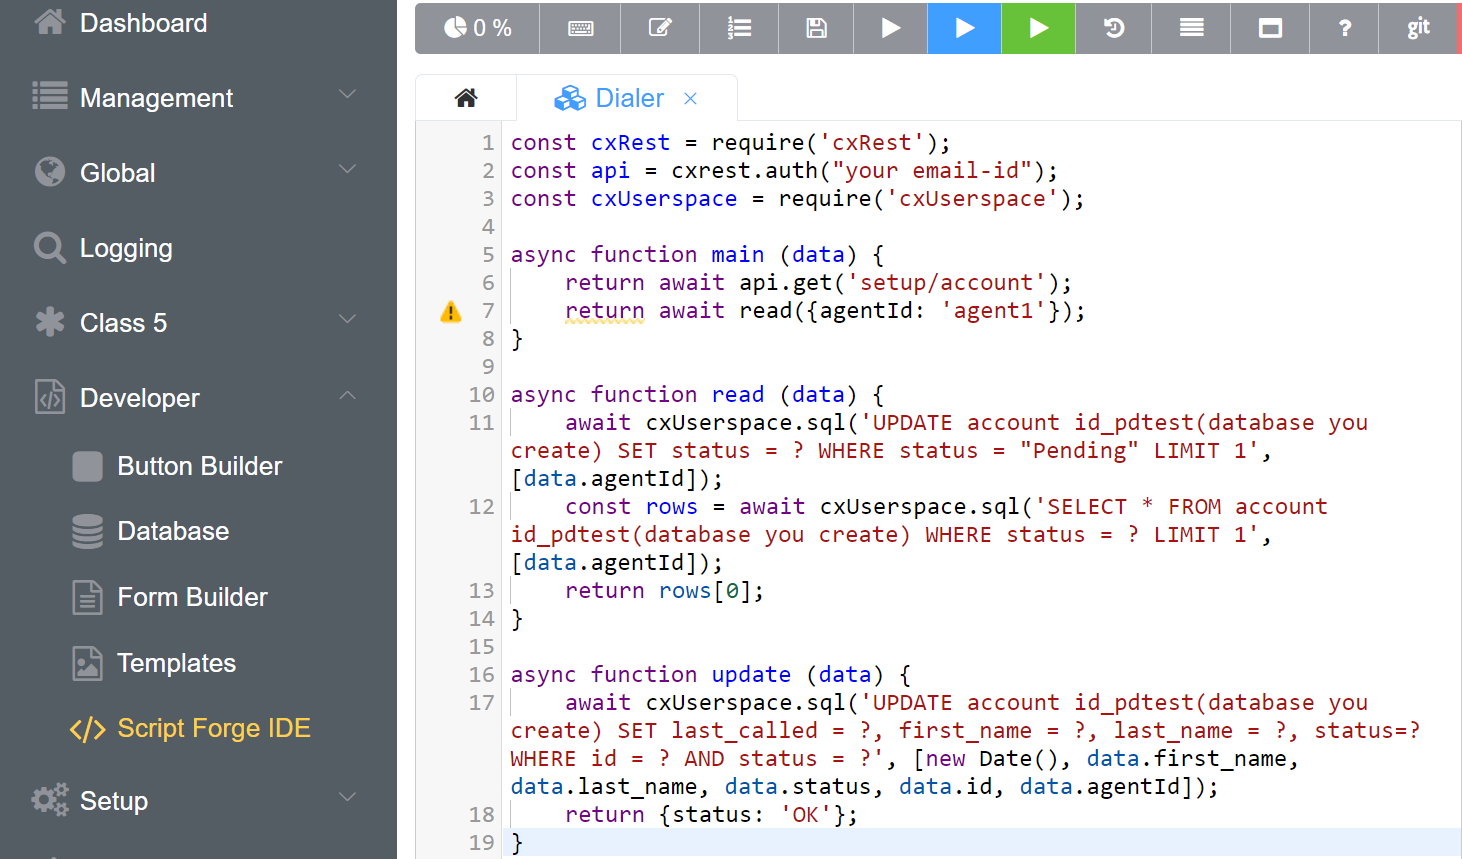
Step 3.1: Codes for the Preview Dialer
- Main Agent Script (for reading and updating the customer information from the Database)
const cxUserspace = require('cxUserspace'); // This line imports the cxUserspace module into the current script.
const api = cxrest.auth("your email-id"); // It sets up authentication using the "cxrest" module by calling the auth() function with an email ID parameter.
const cxUserspace = require('cxUserspace'); // It imports the "cxUserspace" module to make its functionality accessible through the "cxUserspace" constant.
async function main (data) {
    return await api.get('setup/account'); // This line will display your Account ID.
    return await read({agentId: 'agent1'}); // This line will read the agents name.
}
async function read (data) {
/**
* This line declares an asynchronous function named read.
* It takes a single parameter called data.
*/
    await cxUserspace.sql('UPDATE account id_pdtest(database you create) SET status = ? WHERE status = "Pending" LIMIT 1', [data.agentId]);
    /**
     * This line executes an SQL SELECT statement on a table account id_pdtest.
     * It retrieves all columns (*) from the table where the status column matches the value in data.agentId.
     * The LIMIT 1 clause ensures that only one row will be returned. The cxUserspace.sql function is awaited,
     * indicating that it is an asynchronous operation.
     */
    const rows = await cxUserspace.sql('SELECT * FROM account id_pdtest(database you create) WHERE status = ? LIMIT 1', [data.agentId]);
    /**
     * This line returns the first row from the result of the SELECT statement.
     * It assumes that the rows variable holds an array of rows returned by the SELECT statement.
     */
    return rows[0];
}
📝 Note
The code brings in a special module called "cxUserspace" that helps with working with databases. Then, there is a function called "read" that does some important things. It updates a specific table in the database by changing the status of a row to a new value given in the "data.agentId" part.
It makes sure to only change one row at a time. After that, it looks for a row in another table that matches the new status
and gets all the information about that row. Finally, it gives back the first row it found as the result of the function.
📝 Note
The Read script will let us pull information from the database (testpd). This code will pull up the next person on the list.
async function update (data) { // It defines an asynchronous function named update that takes a single parameter (data).
    await cxUserspace.sql('UPDATE account id_pdtest(database you create) SET last_called = ?, first_name = ?, last_name = ?, status=? WHERE id = ? AND status = ?', [new Date(), data.first_name, data.last_name, data.status, data.id, data.agentId]);

    return {status: 'OK'};
    /**
     * This line returns an object with a single property status set to the string value 'OK'.
     * This object will be the result of the update function.
    */
}
📝 Note
It updates a table in a database by changing the values of certain columns. The values it changes are
given in a special object called "data." It uses the values from "data" to decide which rows to update in the table. After it finishes updating, it says everything went well by giving back a special message that says "OK."
📝 Note
"The Update script will let us update information from the database (testpd).
This code will update information such as **First Name**, **Last Name** and **Phone_code**.
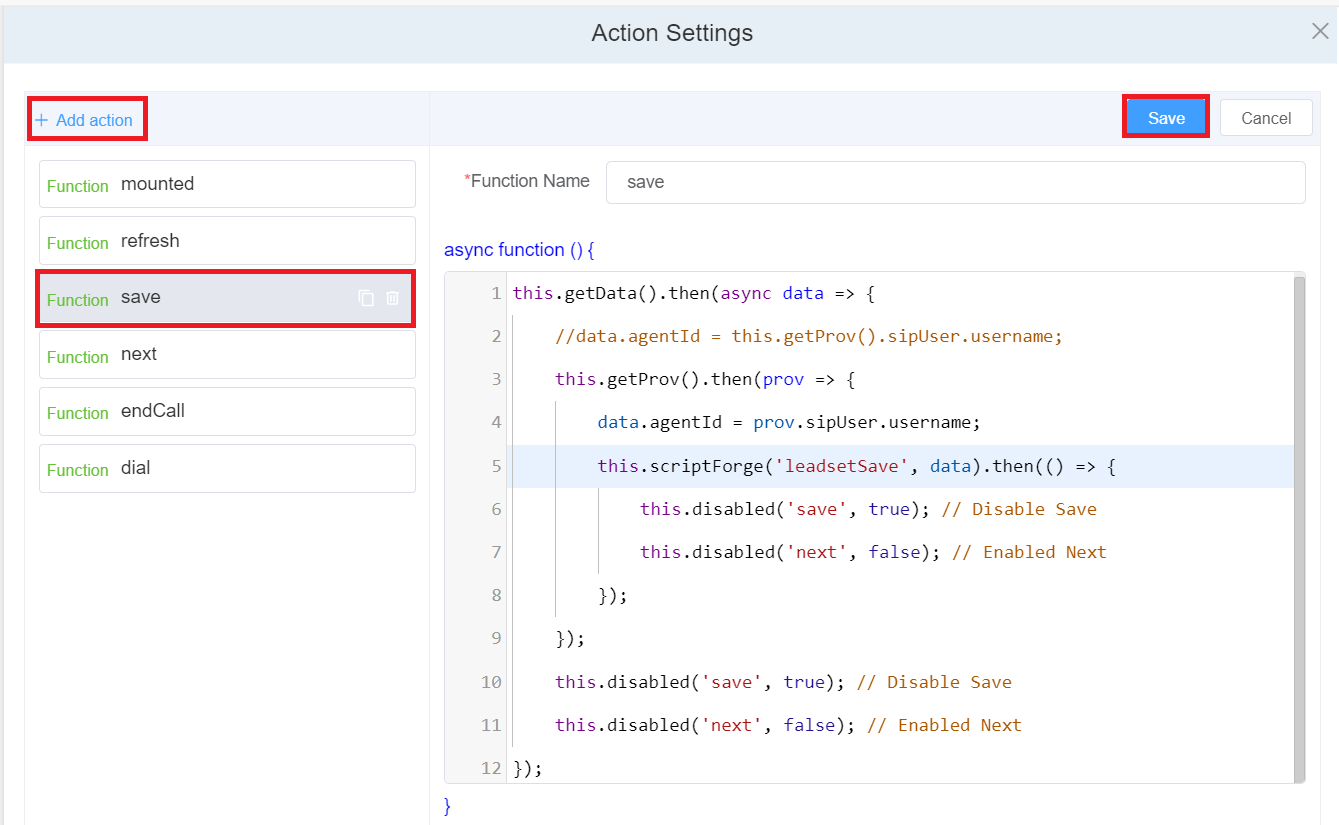
- Code for Save Button
  this.getData().then(async data => { // Get the page's data.
      this.getProv().then(prov => { // Get the user's provision information such as thier user name.
                  data.agentId = prov.sipUser.username; // Set the page's Agent ID field
          this.scriptForge('leadsetSave', data).then(() => { // Save the page's altered data
              this.disabled('save', true); // Disable Save
                      this.disabled('next', false); // This line disables the 'next' form button and makes it unusable and unclickable.
        /**
         * The ScriptForge method in this line, calls a remote Script-Forge function named 'leadsetRead'.
         * It takes an agentId and returns a promise object.
        */
  });
📝 Note
When you click on the Save button, it will get the agentID.
It will disable the save button and enable the next button.
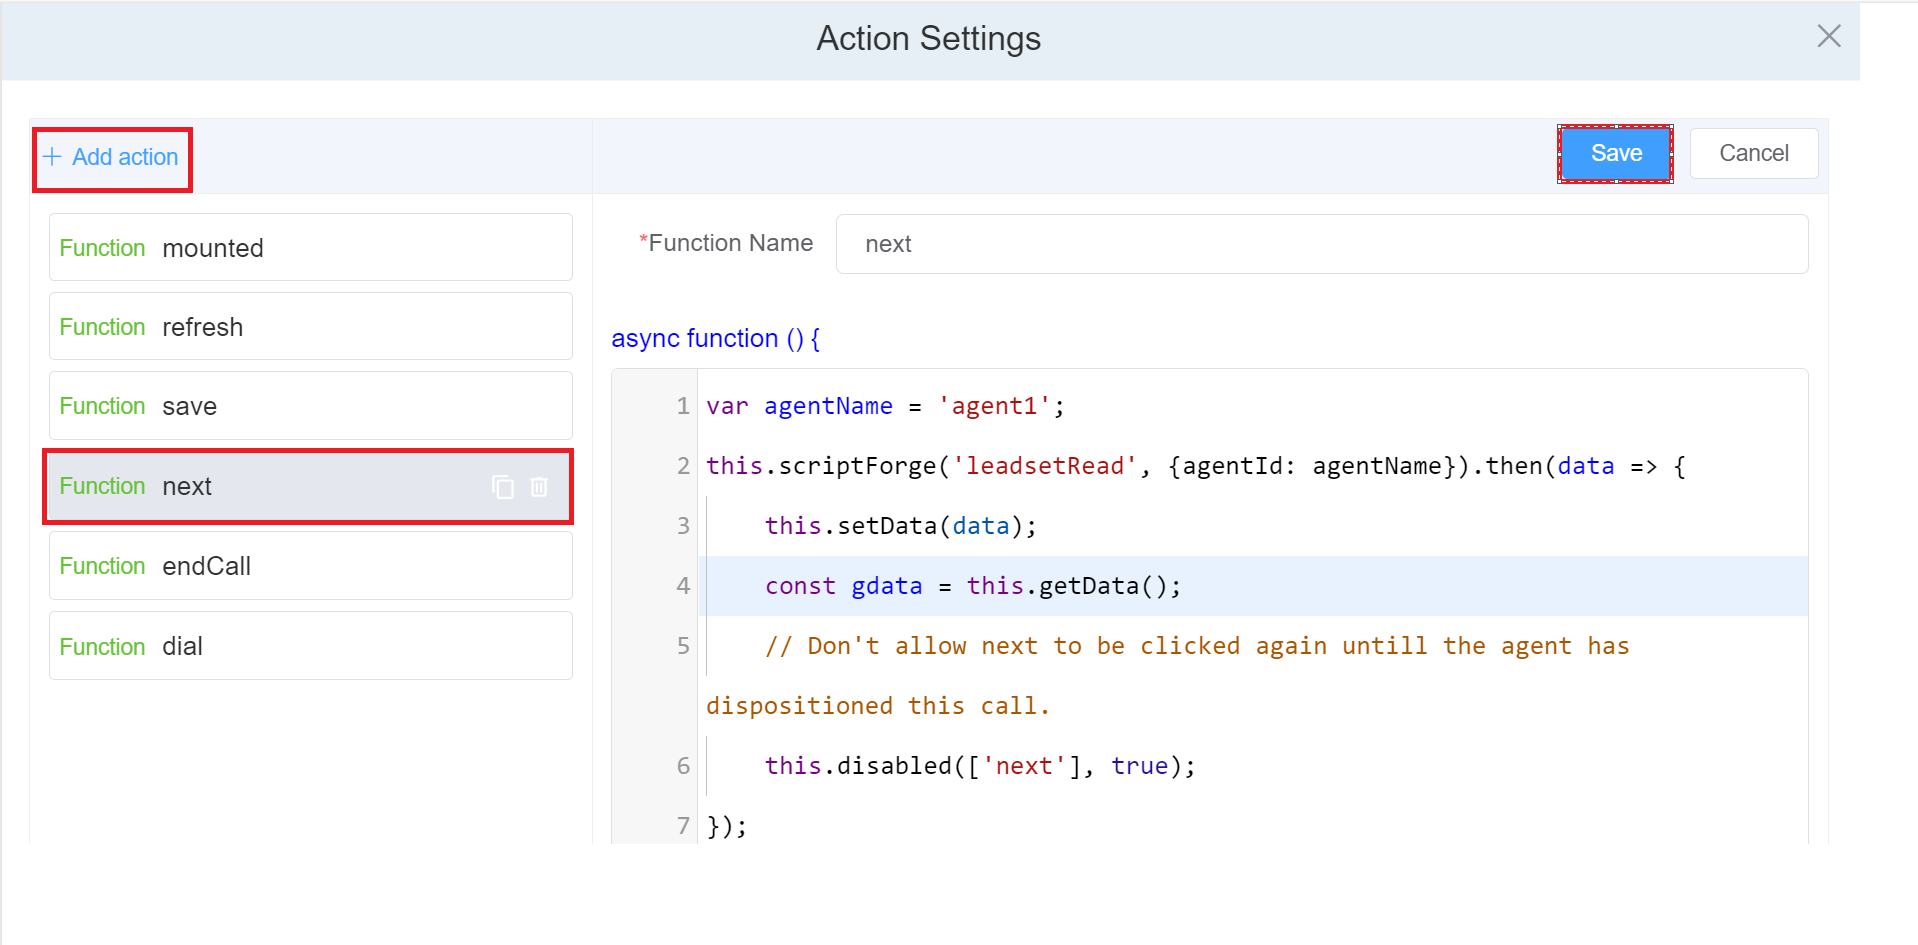
- Code for NEXT Button
var agentName = 'agent1'; // Set an Agent Name which is to be set as an Agent ID.
this.scriptForge('leadsetRead', {agentId: agentName}).then(data => { // Get an Agent's Information based on their ID.
    this.setData(data); // Update the Page's data with the new Agent's Information.
    const gdata = this.getData(); // Get the Page's updated data
    this.disabled(['next'], true); // Don't allow next to be clicked again until the agent has dispositioned this call.
});
📝 Note
The code retrieves the username of a SIP user from a provider and uses it to execute a script operation related to leadsets.
The received data is then processed and handled using a method called setData.
Additionally, the code disables the 'next' functionality based on certain conditions or logic by invoking a method named disabled.
📝 Note
1. This code will run when the **Next** button is clicked. It will get back the data and setData(data) will fill in the details of the Input fields.
2. Make the **Next** button DISABLED until the agent has dispositioned this call.
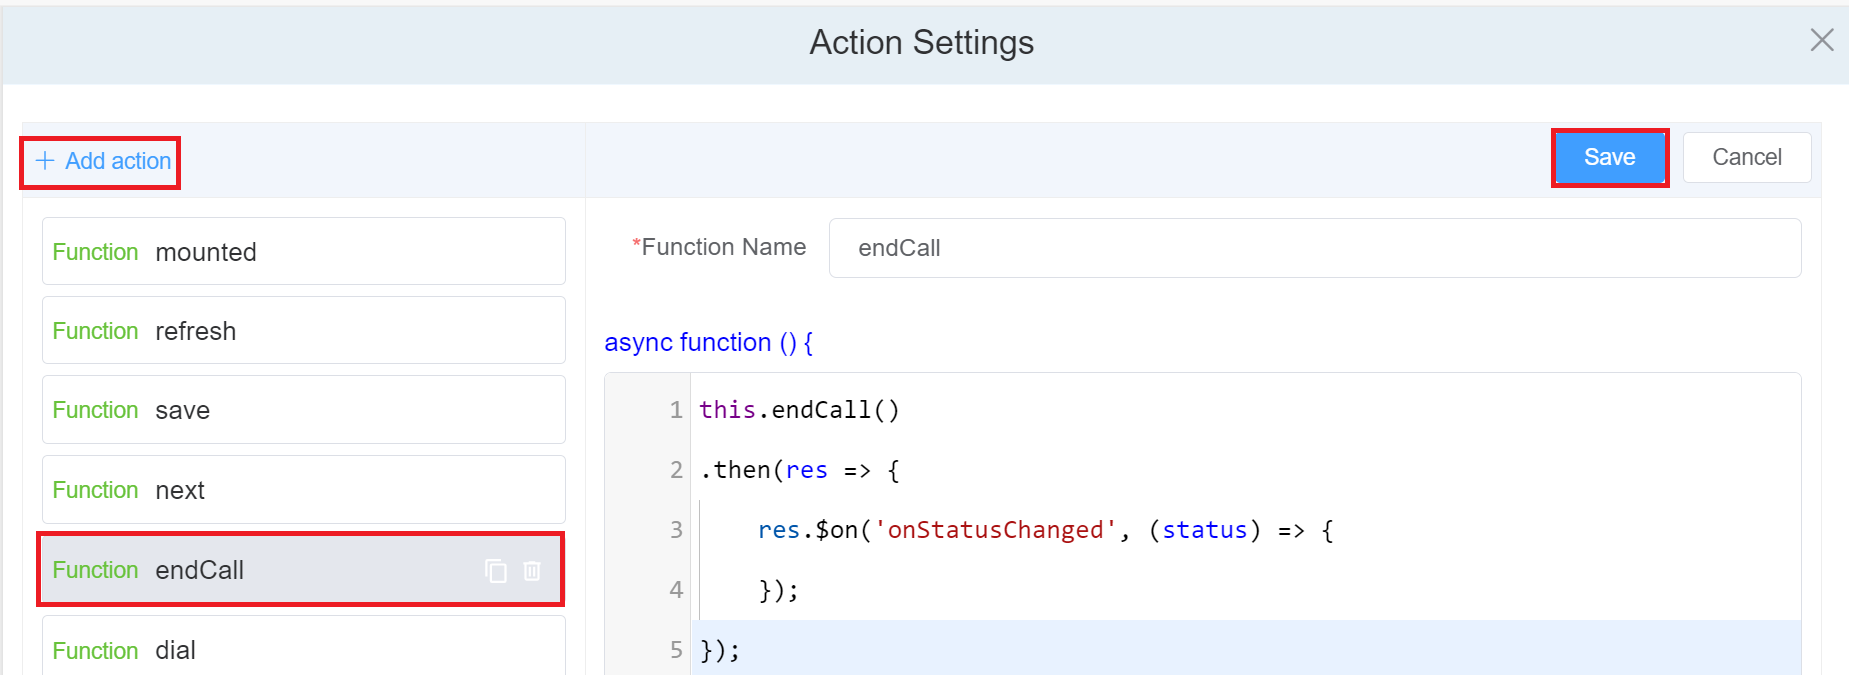
- Code for End Call Button
this.endCall() // It initiates the process of ending a call. The endCall() method is expected to return a promise.
.then(res => { // The then() method takes a callback function as an argument, which will be executed when the promise is resolved.
    res.$on('onStatusChanged', (status) => { // When this event occurs, the provided callback function will be executed, and the status parameter will contain information related to the event.

        /**
         * This line logs a message to the console.
                 * It indicates that the call has ended and provides information about the changed status, specifically the session property of the status object.
         */
    });
});
📝 Note
This code initiates the process of ending a call using the endCall() method.
It then sets up an event listener to capture any status changes related to the call.
When the call's status changes, the provided callback function is executed, and the updated session status is logged to the console.
If any errors occur during the process, they are caught and logged as well.
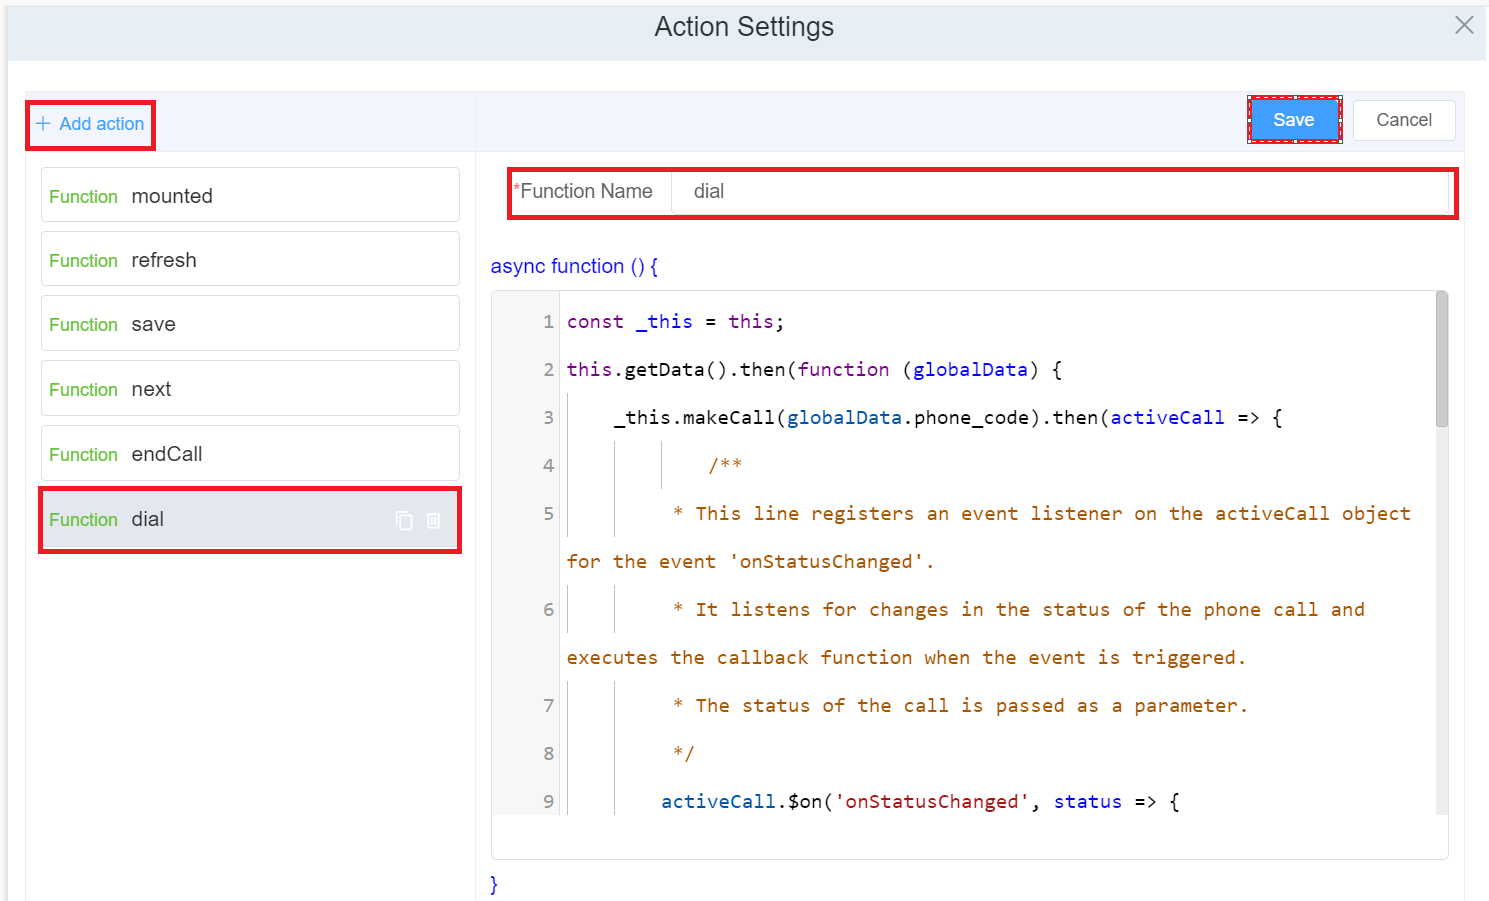
- Code for DIAL Button
/**
 * This line calls a method named makeCall on the current object (this).
 * It passes the result of calling this.getData('phon_code') as an argument.
 * It suggests that the makeCall method initiates a phone call using the provided phone number.
 * The method returns a promise that resolves to an activeCall object.
 */
const _this = this; // Kepp track of the current page's context
this.getData().then(function (globalData) { //// Get the page's data
        _this.makeCall(this.globalData('phone_code')).then(activeCall => {
        /**
     * This line registers an event listener on the activeCall object for the event 'onStatusChanged'.
     * It listens for changes in the status of the phone call and executes the callback function when the event is triggered.
     * The status of the call is passed as a parameter.
     */
    activeCall.$on('onStatusChanged', status => {
        switch (status.session) {
                /**
             * This line starts a switch statement based on the value of the status parameter.
             * The status can be Establishing, Terminated etc.
             */
            case "Establishing":
                    /**
                     * This line specifies the code that will run when the first case of the switch statement is true.
                 * For this case when the status is "Establishing".
                 */
                this.disabled('hangup', false); // This line enables the 'hangup' button.
                break; // This line ends the execution of the "Establishing" block.
            case "Terminated":
                    /**
                     * This line specifies the code that will run when the first case of the switch statement is true.
                 * For this case when the status is "Establishing".
                 */
                this.disabled('save', false); // This line enables the 'save' button.
                break; // This line ends the execution of the "Terminated" block.
                this.disabled('hangup', true); // This line disables the 'hangup' button.
                break; // This line ends the execution of the "Establishing" block.
            case "Terminated":
        }
    });

});
📝 Note
This code makes a phone call using the phone number obtained from the getData method.
It then registers an event listener on the activeCall object to listen for changes in the call status.
Depending on the status value, it enables or disables certain functionalities or elements using the disabled method.
📝 Note
This code will run when the **Dial** button is clicked. In this code, we have various switch cases.
For example, when the call with the ESTABLISHING and ENDED STATUS the End Call button is not DISABLED.
Similarly, you can decide the function of each button with reference to the STATUS.
Step 4
In the previous steps, we developed the Customer Database, User Interface, provided the Programming Logic, and bound all these steps together.
The next step is to see the functionality on the “Webphone”.
But before that, we need to build a button on the “Webphone” to access the Preview Dialer.
Thus, we guide you to build the same.
- Login to your Customer Portal.
- Go to Developer > Button Builder, and then on the blue
+sign on the top-right. - You will see a form on the screen, put the label as Preview Dialer.
- Select the Area where you want the button. So that would be “Webphone” and you can select either Footer Navigation, Side Navigation or Page.
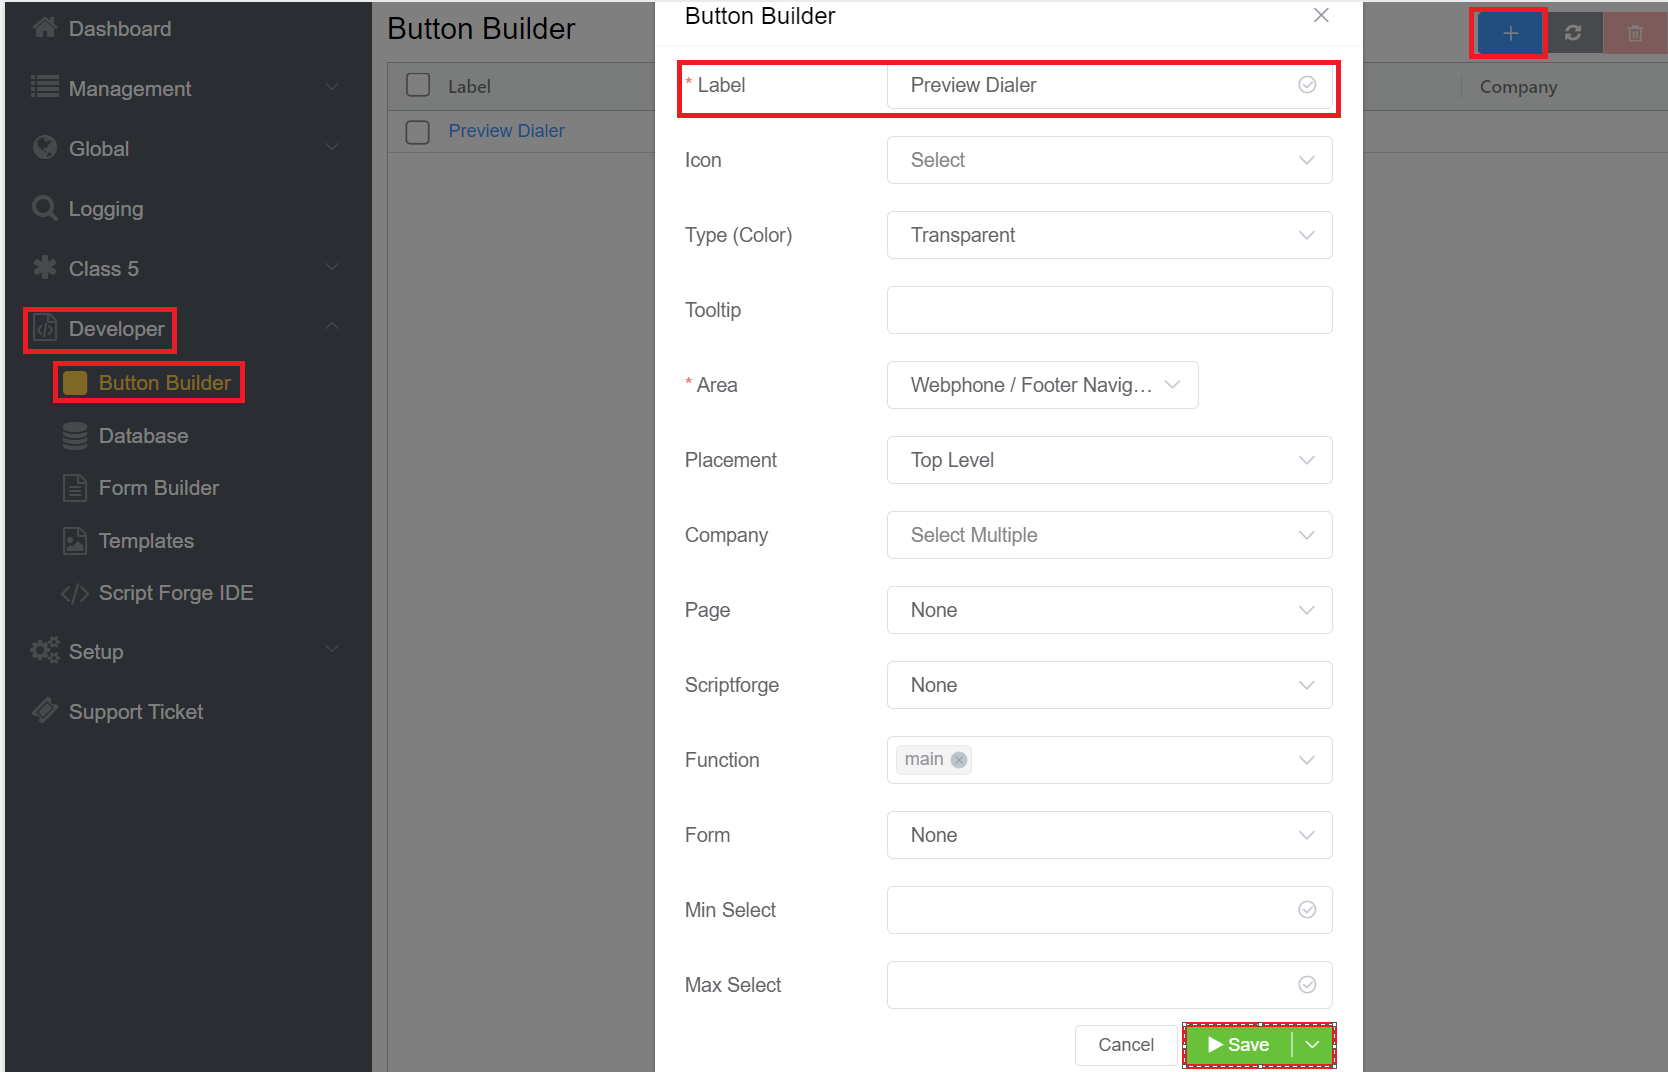
- Login to your webphone and start using the Preview Dialer.
Conclusion
In conclusion, both agents and their clients have found the preview dialer to be a useful tool. The ability to preview call information before dialing allows agents to have better conversations. It has resulted in increased productivity and more successful sales calls.
Customers appreciate the personalized touch that the preview dialer provides. It makes them feel valued and heard.
It's probable that call-center technology will go even further as technology develops. It will further improve consumer satisfaction and promote corporate success.
Now that you have successfully Built Your Own Preview Dialer, it is time for you to upgrade to a more advanced one and we can help you during this journey of yours.